Pages

Saturday, September 7, 2013

HANDMADE ROSARY and ROSARY BRACELETS

Hello everyone!  I received my order from Fire Mountain Gems and Beads yesterday, I could not wait to make rosaries, bracelets, earrings, and necklaces.  These are the projects I had finished last night....
A rosary made of sesame jasper beads about 15mm round beads with gold plated wirings and gold plated crucifix and rosary connector.
 
A 7 inch rosary bracelet made of brown aventurine puffed oval beads adorned with copper bead caps and antiqued copper crucifix.
 
A 7 inch rosary bracelet made of red agate nugget beads adorned with copper bead caps and antiqued copper crucifix.

Thursday, September 5, 2013

I can't really put down my jewelry tools!

Late last night before going to bed I started to check on my beads as I have a stash of beautiful beads which I purchased at Jewelry.com, in fact these beads I bought from their auction centre...I realized that I have not even touched them since I received them since last year.  These are the beads that I won in an auction from jewelry.com...an amethyst oblong beads, very lustrous and beautiful in color...I made it as a necklace with a gold plated wirings and a lobster clasp.
I love these color, lavender or purple!

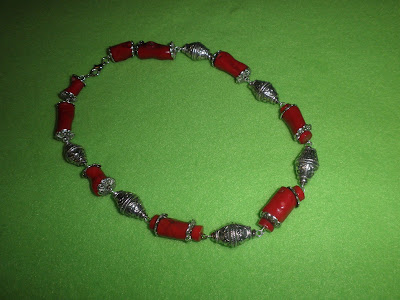
Millefiori Beads Rosary & Red Coral Beads Necklace

I haven't put my jewelry tools yet, what I have done last night were rosary and necklace...the rosary is made of millefiori beads and the necklace is made of red bamboo coral beads...I will be going away for 6 weeks to visit my family in Toronto, Canada....Yey!  It would be my first trip this year, I should have been there in July but due to one of our dogs' pregnancy I stayed for the birth of our puppies.  We have 3 little pups (Papillon pure bred), they're adorable and cutie pies...lol...you might have seen some photos here which I had posted quite recently....Have a great day all.
Millefiori beads Rosary
 
Red Bamboo Coral Beads Necklace
 
Three little pups nursed by their mother...

Wednesday, September 4, 2013

PILLOW CUSHIONS

I have been contemplating to replace our old pillow cushions for the sofa and love seat in our living room.  I picked a floral fabric to go with a brown fabric using it as piping on the sides...the other image were my old pillow cushions, I am going to put them away, perhaps next time I will be re-using them again. 
These are the materials I picked, perhaps I might change my mind later on with the brown fabric piping, I would love to have something that will catch my eyes when it comes to adorning a pillow cushion.
 
The above were the pillow cushions we had for the last 2 years, we never changed them, but I always ensure that they're clean as I wash them once a month.  The fabric and the color are getting dull.......

MORE HANDMADE JEWELRIES

Well, I cannot really put down my jewelry making tools as I had started to make more, I completed and finished 2 necklaces and a bracelet last night before going to bed.  It was quite late although, I love to finish them before I can start a new one.  My crocheting can wait until I get back from my vacation....however once I started to create something on jewelry making, I don't really want to stop, I want the finished product right after.....lol...:-) These are some of my handmade jewelries made late last night....
An 18 inch double necklace made of cherry quartz beads wired in a gold plated wirings (made the eye pins myself) with a lobster clasp.
 
The above image is a 20 inch peyote stitch turquoise nugget beads necklace wired in a gold plated wirings with a lobster clasp.
 
This one is a 7 inch elasticized bracelet made of drum-like porcelain beads.  These were the jewelries I made from last night before going to bed. 

Tuesday, September 3, 2013

HANDMADE BRACELETS

Hello Everyone!  I put away my crocheting in the meantime and started making jewelries, a passion since I retired early last year.  I made several bracelets till late last night, and these are the bracelets made from different beads, adorned them with antique silver filled and antique gold filled charms, drops, and more.  These bracelets were all elasticized, they can be adjusted.
A 7 inch bracelet made with glass beads with antique silver filled drops and crucifix
 
Another 7 inch bracelet made of tiger eye beads with antique silver filled charms and drops.
 
6 1/2 inch handmade bracelet, made of red agate nugget beads with antique gold filled drops and charms.
 
6 1/2 inch handmade bracelet, made of red bamboo coral beads with antique silver filled drops and crucifix.

Monday, September 2, 2013

NECKLACES

Hello everybody!  I put my crocheting projects aside for awhile; started to make and bead beads to form a necklace.  What I have here for you are 3 necklaces handmade, made of different kinds of beads and stones...different wirings and used lobster clasp.  Made them until 2AM this morning.......
An 18 inch necklace made of obsidian black/jade olive beads with multi quartz pebble beads wired in a hematite wirings (I made the eye pins on them) with a lobster clasp.
 
Also an 18 inch necklace with peyote stitch made of jasper beads and cherry quartz beads, wired with bronze eye pins and bronze lobster clasp. 
 
Another 18 inch necklace in gold filled wirings, (eye pins were also handmade) made of purple quartz beads with gold filled lobster clasp.

Sunday, September 1, 2013

READING SYMBOLS in CROCHETING

When I started crocheting, I have learned it through looking at a crocheted project or finished product.  I have no idea how to read instructions or how to read symbols until I came to Canada.  When I started to learn how to crochet (that was in grade school)  basically they taught us the simplest and easiest project to do, such as single stitch, double stitch, triple stitch, loop and so on and so forth.  Now I became familiar with all these abbreviations in crocheting,  I would like to inspire you  and learn it from me that you too can do it, just like myself!  :-) Always keep your "crochet instructions" handy plus "reading symbols or diagrams of crocheting whenever you have a project to do.  It's the simplest and easiest way of learning how to crochet.  Hope you all learn from these reading materials I have for you....thank you all!  ** Please click to the image to make it larger so you can see the symbols a lot bigger and better....:-)
READING SYMBOLS:
Symbol diagrams are another way to convey crochet instructions.  Every symbol in the diagram represents a specific stitch as it appears from the right side of the work.  The rows are marked on  the diagram, beginning at the bottom with the foundation row (FR).  The numbers alternate side to side even rows on the right, odd rows on the left, because you will be working in alternating directions as you move from row to row, right side to wrong side.  The diagram is accompanied by a key to help you identify the symbols.  Though there may be some subtle differences in the way the symbols look, designers use a standard set of symbols. 

CROCHET INSTRUCTIONS for BEGINNERS and EXPERIENCED


A lot of beginners in crocheting have difficulty in learning abbreviated instructions in crocheting.  I have a list of abbreviations for those who would like to learn and start to crochet as their hobby.  I learned how to crochet when I was in Grade School (Home Economics)
**PLEASE CLICK TO THE IMAGE BELOW FOR BETTER, BIGGER, and LARGER IMAGE
 at 11 years of age..  My entire family are crocheters, we learned from each other.  We crocheted our curtains, drapes, doilies, table runners, coasters, and many more, even laces for my mother's camisole were crocheted...:-) I wish this will help you all to learn all the abbreviations of crocheting. 

Crochet techniques are the same universally, and everyone uses the same terms.  However, US patterns and UK patterns are different because the terms denote different stitches.  Here is a conversion chart to explain the differences.

US                                                                                                   UK
single crochet (sc)                                                               double crochet (dc)
half double crochet (hdc)                                                   half treble (htr)
double crochet (dc)                                                             treble (tr)
triple crochet (tr)                                                                double treble (dtr)

Are you ready for Christmas? Free Pattern and Instructions of how to Crochet PINE TREES STITCH

Christmas is fast approaching!  If you are interested in making a table cover or a spread, what I have here for you is a pattern and instructions how to crochet PINE TREES CROCHET STITCH.  This is easy and simple to crochet, if you are just a beginners, you can follow the pattern alone.  You do not have to be experienced in starting this project.  ** PLEASE CLICK TO THE PATTERN FOR BIGGER AND BOLD IMAGE..
PINE TREES CROCHET STITCH
Skill Level:  Intermediate, Easy


Ch a multiple of 10 plus 4

FOUNDATION ROW:  1 dc in 4th ch from hook, *ch 4, skip next 4 ch, 1 sc next ch, 4 ch, skip next 4 ch, e dc in next ch, repeat from * across, ending with 2 dc in last ch, turn.

ROW 1: Ch 2 [counts as first dc]. skip first dc, 2 dc, in next dc, *ch3, 1 sc in next sc, ch 3, 2 dc in next dc **, 1 dc in next dc, 2 dc in next dc, repeat from * across, ending last repeat at **, 1 dc to of turning ch, turn.

ROW 2: Ch 2 [counts as first dc], 1 dc in next dc, 2 dc in next dc., *ch 2, 1 dc in next sc, ch 2, 2 dc in next dc**, 1 dc in each of next 3 dc, 2 dc in next dc, repeat from *across, ending last repeat at **, 1 dc in next dc, 1 dc in top of turning ch, turn.

ROW 3: Ch 2 [counts as first dc], skip first dc, 1 dc in each of next 2 dc, 2 dc in next dc, *ch 1, 2 dc in next dc** , 1 dc in each of next 5 dc, 2 dc in next dc, repeat from * ending last repeat at **, 1 dc in each of the next 2 dc, 1 dc in top of turning ch, turn.

ROW 4:  Ch 1, 1 sc in frist dc, *ch 4, skip next 4 dc, 3 dc in next ch-1 space, ch 4, skip next 4 dc, 1 sc in next dc, prepeat from *across, ending with last sc in top of turning ch, turn.

ROW 5:  Ch 1, 1 sc in first sc, *ch 3, 2 dc in next dc, 1 dc in next dc, 2 dcin next dc, ch 3, 1 sc in next sc, repeat from *across, turn.

ROW 6: Ch 5 [counts as dc, ch 2], *2 dc in next dc, 1 dc in each of next 3 dc, 2 dc in next dc, ch 2, 1 dc in next sc, ch 2, repeat from * across, ending with 1 dc in last sc, turn.

ROW 7:  Ch 3 [counts as first dc], *2 dc in next dc, 1 dc in each of next 5 dc, 2 dc in next dc, ch 1 repeat from * across, omitting last ch-1 space, 1 dc in red ch of turning ch-5, turn.

ROW 8:  Ch 2 [counts as first dc], 1 dc in first dc, *ch 4, skp next 4 dc, 1 sc in next dc, ch 4, skip next 4 dc, 3 dc in next ch-1 space, repeat from *across, ending last repeat at **, 2 dc in top of turning ch, turn.

REPEAT 1-8 for pattern
 As you can see the crocheted image I am showing you is the right side up once you have completed your project.  It does look like pine trees when it's done.  I will also be showing you some terminology of crocheting here in my blog so for those who are just beginning to learn how to crochet, you have at least an idea how to read an instructions....thank you all.  I hope these crocheted projects I have shown you will inspire you to start crocheting.   :-)